That small gap at the bottom of your garage door is doing more than letting in a little light. On the Gulf Coast, it acts as a highway for heavy humidity, corrosive salt air, and persistent pests like frogs and palmetto bugs. You probably already realize those rising energy bills are tied to these air leaks, but the confusion over T-style, bulb, or bead profiles often makes a garage door weather seal replacement feel like a technical headache. It's frustrating to watch your air conditioning work overtime just because a piece of rubber has reached the end of its natural lifespan.
A professional-grade seal is a critical moisture-management strategy rather than just a simple draft-stopper. This guide helps you identify the exact seal profile your door requires and explains how to choose materials built to survive our intense coastal climate for five to ten years. We will walk through the selection process and the specific steps needed to ensure your garage stays dry, your cooling costs drop, and your home remains pest-free for the long haul.
Key Takeaways
- Understand why moisture management is essential for Gulf Coast homes to prevent floor sweating and hardware corrosion.
- Learn to identify your specific seal profile, including T-style and Wayne Dalton P-bulb designs, by inspecting the aluminum retainer.
- Follow a safe, step-by-step process for garage door weather seal replacement to block out pests and salt air.
- Discover how to seal the entire opening, including the jambs and header, to stop energy leaks and wind-driven rain.
- Recognize the safety risks of working near tensioned cables and when a door's alignment requires professional adjustment.
Why Garage Door Weather Seal Replacement is Critical for Gulf Coast Homes
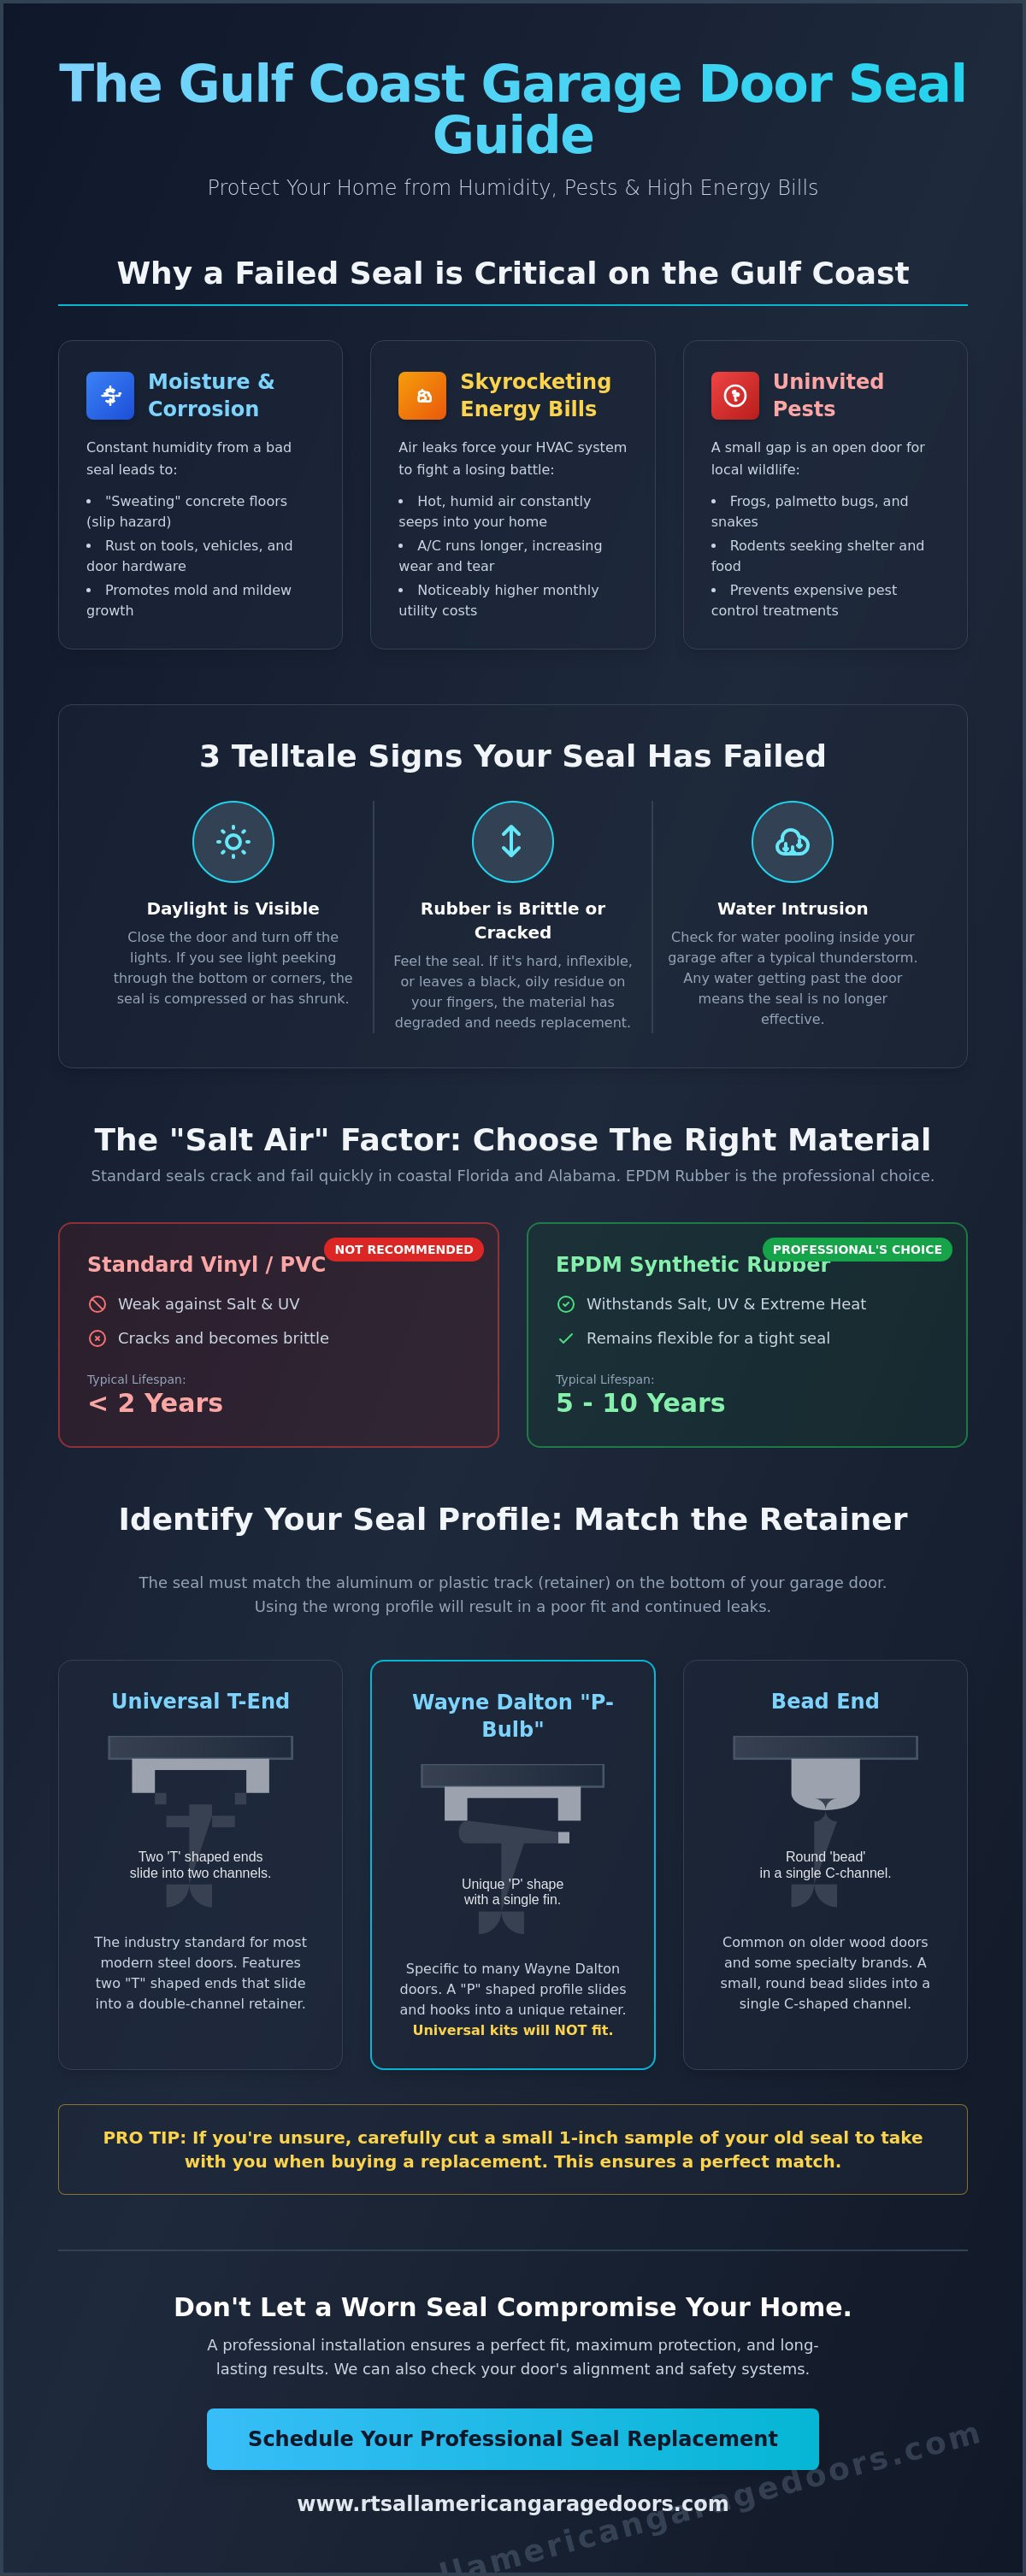
Living along the Gulf Coast means your home faces environmental pressures that inland properties never encounter. A garage door represents the largest opening in your house; if the seal at the bottom is compromised, you're essentially inviting the local climate inside. Most people think what is weatherstripping? is just a way to stop a light breeze, but in our region, it's a vital moisture barrier. High humidity levels lead to "sweating" garage floors, where condensation builds up on the concrete. This creates a slip hazard and promotes rust on your tools, bicycles, and the door's metal tracks.
Energy efficiency is the other major factor for local homeowners. When it's 90 degrees with 80% humidity in Navarre or Pensacola, your air conditioner works overtime to cool the rooms adjacent to the garage. A gap under the door allows that heavy, hot air to seep in constantly. Scheduling a garage door weather seal replacement isn't just about comfort; it's a financial decision to protect your HVAC system and lower your monthly utility bills.
Beyond the climate, a tight seal is your first line of defense against local pests. Baldwin County and the surrounding areas are home to persistent frogs, palmetto bugs, and rodents that view a small gap under your door as an open invitation. A sturdy, well-fitted seal keeps these uninvited guests out of your storage bins and vehicles. This proactive maintenance prevents the need for expensive pest control treatments or repairs to chewed wiring inside your garage.
Signs Your Weatherstripping Has Failed
Don't wait for a flood to check your door. Close the garage door during the day and turn off the lights. If you see "daylight" peeking through the bottom corners, your seal has compressed or shrunk. You can also perform a touch test. If the rubber feels brittle or leaves a black, oily residue on your fingers, the material has chemically broken down. Finally, look for water pooling inside after a typical afternoon thunderstorm. If rain is getting past the door, your seal is no longer functional.
The "Salt Air" Factor: Why Alabama and Florida Seals Rot Faster
Homeowners in Pensacola Beach and Gulf Breeze deal with salt spray that acts as a corrosive agent. Standard vinyl or low-grade PVC seals often crack within two years in these conditions because the salt and intense UV rays strip away their flexibility. We recommend EPDM rubber for any garage door weather seal replacement in coastal areas. EPDM is a synthetic material that withstands extreme heat and salt exposure without losing its shape. It's also wise to inspect your seals after every major storm season, as wind-driven debris can tear the rubber or pull it out of the retainer.
Identifying Your Seal Type: T-Style, Bulb, and Wayne Dalton Variations
Before you begin a garage door weather seal replacement, you must inspect the "retainer." This is the aluminum or plastic track fastened to the bottom of the door that holds the seal in place. If your retainer is bent, crushed, or corroded by salt air, even the highest-quality rubber won't seat properly. You'll need to ensure the retainer is clean and straight before attempting to slide in a new seal. Understanding the specific shape of the seal's "end" is the only way to ensure you buy a compatible product that won't slide out of the track.
Common Bottom Seal Profiles
- Universal T-End: This is the industry standard for most steel doors. It features two T-shaped ends that slide into two separate grooves in the retainer.
- P-Bulb: This is the specific profile required for many Wayne Dalton Classic Steel doors. Universal kits rarely fit these doors, so you must verify the P-shaped profile before purchasing.
- Bead End: Common on older wood doors or specialty brands. These seals have a round, circular bead that slides into a single-channel retainer.
Using the wrong profile is a common mistake that leads to frustration. A T-style seal will not stay in a P-bulb retainer, and forcing it will likely damage the aluminum track. If you're unsure which profile you have, cut a small one-inch sample from your existing seal and bring it with you when shopping for materials. This ensures you get a tight, professional fit that helps reduce energy bills by eliminating air gaps.
How to Measure for a Perfect Fit
Precision is key when ordering your replacement. First, measure the width of the "T" or "Bead" at the top of the seal. The most common sizes are 1/4 inch and 5/16 inch; even a small difference will prevent the seal from sliding through the retainer. Next, measure the total width of your garage door. Always add at least two inches to this total. Rubber naturally shrinks over time, and having an extra inch on each side allows you to tuck the ends in for a cleaner look and a better seal against the jambs.
Don't assume a standard 3-inch wide seal is sufficient. In Navarre and surrounding coastal areas, driveways often shift or settle, creating uneven gaps. If you can see light under one side of the door but not the other, you might need a 4-inch or 6-inch "Giant" seal to bridge the distance. If your retainer is too damaged to hold a new seal, it's often best to seek professional garage door weather seal installation to replace the entire track system. This ensures the hardware is properly aligned and the new rubber provides the maximum protection against Gulf Coast humidity.
Step-by-Step Guide: How to Replace Your Garage Door Bottom Seal
Safety is the most critical part of any garage door project. Before you start your garage door weather seal replacement, you must disconnect the automatic opener by pulling the red emergency release cord. Lift the door manually until the bottom section is at chest height. Secure the door in this position by placing a pair of vice grips on the vertical tracks just below the rollers. This prevents the door from moving while your hands are near the bottom retainer. Never attempt this work with the door fully open overhead, as the weight distribution can be unpredictable.
Removing the old seal is often the most frustrating step for homeowners in Navarre and surrounding coastal areas. Salt air often corrodes the small screws at the ends of the aluminum retainer, making them difficult to turn. Use a pair of pliers or a flathead screwdriver to remove these screws first. If the old rubber is brittle and stuck, don't try to pull the entire length at once. Cut it into smaller sections with a utility knife and pull them out piece by piece. If the rubber has "melted" into the track due to high Gulf Coast heat, you may need to use a flathead screwdriver to scrape the channels clean.
Tools and Materials Needed
- New EPDM rubber seal: Ensure you have the correct profile (T-style, P-bulb, or Bead) and at least three extra inches of length.
- Silicone spray lubricant: Use only 100% silicone spray. Avoid petroleum-based products like WD-40, which cause rubber to degrade and swell over time.
- Stiff nylon brush: Essential for cleaning out the retainer tracks.
- Basic hand tools: A utility knife, flathead screwdriver, and needle-nose pliers.
The Pro Technique for Sliding the Seal
Most DIYers skip the most important step: prepping the track. Use a stiff brush to scrub the entire length of the aluminum retainer. Salt, sand, and grit accumulate in these channels and act like sandpaper, making it nearly impossible to slide new rubber through. Once the track is clean, apply a generous coating of silicone spray directly into the channels. This lubrication is what allows the rubber to glide without bunching or tearing.
This job is significantly easier with two people. Position one person at the end of the door to "feed" the rubber into the tracks while the second person pulls the seal from the opposite side. The feeder should hold the rubber in a "U" shape to help it enter the grooves smoothly. Once the seal is in place, don't trim it flush with the door. Rubber naturally contracts over time. Leave about 1.5 inches of excess on each side and fold it back into the hollow center of the seal. This creates a thicker end-plug that blocks pests and accounts for future shrinkage. Finish by replacing the end screws to lock the seal in place.
Beyond the Bottom: Sealing the Jambs, Header, and Threshold
While a garage door weather seal replacement often focuses on the bottom rubber, that only addresses one side of the rectangle. Wind-driven rain during a Gulf Coast tropical storm doesn't just fall straight down; it hits your door sideways. If your side jambs and top header aren't sealed, moisture and salt air will bypass your new bottom seal entirely. You can verify your current setup with a simple "Light Test." Close the door during a sunny afternoon and stand inside the dark garage. If you see slivers of light around the sides or top, your perimeter protection has failed and your cooling costs are likely suffering.
Installing Perimeter Weatherstripping
Perimeter weatherstripping, also known as stop molding, consists of a rigid flap of vinyl attached to the door frame. To install it correctly, press the vinyl flap against the door so it bends slightly. It should create a snug seal without putting excessive pressure on the door panels. If the flap is too tight, it can cause the door to bind or create a loud squeaking sound during operation. If you notice this, you may need to learn how to fix a noisy garage door to address the friction issues. Using color-matched trim ensures this seal blends into your home's exterior, improving curb appeal while keeping out insects and humidity.
When to Use a Threshold Seal
Sometimes, even a high-quality bottom seal cannot overcome a driveway that is pitted, cracked, or sloped toward the house. This is common in low-lying areas of Baldwin County where standing water is a frequent issue after heavy downpours. In these cases, a threshold seal is your best defense. Unlike the seals attached to the door, a threshold is a heavy-duty rubber dam glued directly to the concrete floor with industrial-strength adhesive. This creates a permanent barrier that stops water before it ever reaches the door.
When the door closes, the bottom seal rests against the threshold to create a double barrier. This setup is a must-have for homes where the garage floor sits lower than the driveway. It prevents water from rushing under the door during a flash flood. If you're struggling with a complex sealing issue or an uneven floor, our team provides expert garage door weather seal installation to ensure every gap is closed tight against the elements. A 360-degree seal is the only way to truly protect your garage from the corrosive salt air and intense humidity of the Navarre coast.
When DIY Isn’t Enough: Professional Weatherstripping and Door Alignment
A new rubber seal is only effective if the door it's attached to sits perfectly flush against the floor. Many homeowners attempt a garage door weather seal replacement only to find that light still peeks through in the middle or at the corners. This usually happens because the door is "out of square" or the tracks have shifted over time. If your door is hanging crooked, the rubber won't compress evenly, leaving gaps that invite humidity and pests into your space. Adjusting the tracks or the door's balance requires technical precision that goes beyond simply sliding a new piece of rubber into a retainer.
Safety is the primary reason to call a professional for complex sealing issues. The bottom brackets of your garage door are under extreme tension from the cables and springs. Attempting to remove or adjust these brackets to fit a new seal or retainer can lead to severe injury. The technicians at RTS All American Garage Doors have the specialized tools to secure the door safely while performing a garage door weather seal replacement. We also use industrial-grade EPDM rubber, which is significantly thicker and more resilient than the thin vinyl strips found at big-box retailers. This ensures your seal survives the intense UV exposure and salt air common in our coastal environment.
Identifying Structural Issues
Before you buy materials, check for "sagging" in the center of your door. As doors age, especially older wooden or thin steel models, they can bow. This creates a gap in the middle that a standard seal cannot close. In some cases, track realignment is necessary to push the door closer to the jambs for a tighter fit. If your door panels are severely damaged or warped, you may want to review our Wayne Dalton classic steel doors guide to see if a full replacement is a more cost-effective long-term solution.
The RTS All American Garage Doors Advantage for Local Homeowners
Local families in Pensacola, Gulf Breeze, Navarre, and Baldwin County trust us because we understand the specific demands of Gulf Coast weather. We don't use vague estimates or hidden surcharges; our standardized pricing structure provides financial clarity from the start. Our team is also well-versed in hurricane proof garage door installation requirements, ensuring your weatherstripping meets local wind-load standards. We focus on providing a steady, dependable presence to ensure your home stays dry and secure against the next afternoon thunderstorm. Schedule your professional weather seal inspection with RTS All American Garage Doors today!
Secure Your Home Against the Gulf Coast Elements
Maintaining a tight seal is the most effective way to protect your garage from heavy humidity and corrosive salt air. You now know how to identify specific profiles like the Wayne Dalton P-bulb and why EPDM rubber is the superior choice for our local climate. A complete 360-degree seal around the jambs and header is what truly lowers your energy bills and keeps out persistent pests. When the rubber is fitted correctly and the door is properly aligned, your entire home becomes more efficient and secure for the long haul.
If your door is out of alignment or you're dealing with rusted hardware, a DIY garage door weather seal replacement might not be enough to solve the problem. RTS All American Garage Doors brings 15+ years of local experience to every job. As a family-owned business, we use local technicians who are experts in Wayne Dalton and LiftMaster systems. We believe in standardized pricing and honest service without hidden costs. Get a Professional Weather Seal Replacement Quote today to ensure your home stays dry. You don't have to fight the Florida humidity alone; a professional seal provides peace of mind for years to come.
Frequently Asked Questions
How much does it cost to replace a garage door weather seal?
The total cost depends on the door's width and the specific material you choose for the project. Standard vinyl seals are generally the most affordable option, while high-quality EPDM rubber costs more due to its durability. If you hire a professional, you will also pay for labor, which is typically billed as a flat service rate or by the hour. Factors like the condition of your existing aluminum retainer can also influence the final investment.
How do I know which size weather seal to buy?
You must measure the width of the "T" or "Bead" at the top of your existing seal and the total width of the door. Most residential doors use either a 1/4 inch or 5/16 inch T-style end. Once you have the profile, measure the door's horizontal width and add at least two inches to account for natural shrinkage. If your driveway is uneven, consider a 4-inch or 6-inch wide seal to bridge larger gaps.
Can I replace the weather stripping myself?
Most homeowners can successfully complete a garage door weather seal replacement if the aluminum retainer track is straight and clean. The process involves disconnecting the opener, securing the door at a comfortable working height, and sliding the new rubber into the channels. It is a two-person job that requires basic tools like pliers and a utility knife. However, if the door is out of alignment, professional help is safer and more effective.
How long should a garage door weather seal last in Florida or Alabama?
A high-quality EPDM rubber seal typically lasts between five and ten years in our coastal environment. Standard vinyl seals often fail much sooner, sometimes within two years, because the intense UV rays and salt air make them brittle. We recommend inspecting your seals every year after the hurricane season peaks. This ensures that wind-driven debris or high heat hasn't compromised the integrity of your home's moisture barrier.
Is there a universal garage door bottom seal that fits every door?
No single seal fits every type of garage door on the market. While "universal" T-style kits work for many steel doors, they won't fit specialty brands like Wayne Dalton, which often require a P-bulb profile. Using the wrong shape will prevent the seal from staying in the track or creating a proper bond with the floor. Always match the shape of the rubber's "end" to the specific grooves in your retainer.
What is the best material for garage door weather seals?
EPDM rubber is the superior material for homes along the Gulf Coast. It remains flexible in extreme heat and resists the corrosive effects of salt spray far better than standard PVC or vinyl. EPDM doesn't crack or leave black residue on your hands when touched, which are common signs of chemical breakdown in cheaper materials. It provides the best long-term defense against humidity and local pests like palmetto bugs.
Why is there still water getting into my garage after replacing the seal?
Water often continues to enter if the door is not properly aligned or if the concrete floor is pitted and uneven. A new seal cannot compensate for a door that hangs crookedly or tracks that have shifted out of square. You should also check the perimeter weatherstripping on the side jambs and the top header. If the floor slopes toward your house, you may need to install a permanent rubber threshold seal on the concrete.
Does my Wayne Dalton door need a special kind of weatherstripping?
Yes, many Wayne Dalton Classic Steel and Carriage House models require a specific P-bulb seal that is proprietary to the brand. Standard T-style seals found at local hardware stores will not slide into these retainers correctly. Attempting to force a universal seal into a Wayne Dalton track can bend the aluminum and make future repairs more difficult. Always verify your door's model and profile before purchasing replacement materials.